- New


This peening jig tool allows you to quickly peen the scythe in a relatively simple way. Working with it is really easy and can be done by everyone but there are some steps to observe to avoid damaging the blade or the peening jig and to achieve the right thickness of the blade edge. The result can be very good.
The minimum recommended hammer weight for use with this hammer recommended by Schröckenfux is 800 g.
Do not use high-speed grinders on scythes and sickles - these will only degrade the blade.
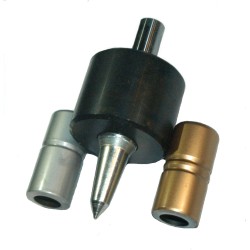
For parts of the peening jig, please refer to the corresponding image displayed above.
SETTING THE PEENING JIG ONTO A WOODEN BLOCK OR A PEENING BENCH
1 - The spike of the anvil should be inserted into a pre-drilled hole with a diameter of about 11mm and a depth of about 50mm.
2 - Gently hammer the anvil into the hole using a piece of wood on top of the anvil. If you knock the anvil in directly with a peening cap or by hammering the guide post, the surface of the anvil or the guidepost may be damaged!
3 - The top of the anvil head should be level with your knees. This means you can use your knees or thighs as additional support for the scythe blade.
PREPARING THE BLADE FOR PEENING
1 - File any cracks and roughness from the edge with a fine metal file. The prepared edge should be even and smooth, without jagged edges.
2 - The taper down to the cutting edge is called the "bevel"; it is approximately 5mm wide. Clean a strip along the edge, at least 5mm wide. Both sides of the blade should be cleaned.
3 - The cleaner the bevel, the easier it will be to see where the cap is striking.
THE BEVEL
1 - The bevel is the width of the peening area within which you are peening. It is approximately 5mm wide of the cutting edge.
2 - The cross section of the bevel is tapered from scythe thickness down to about 0.2mm at the cutting edge. The end of the beveled angle is the cutting edge.
3 - A typical bevel has a width of about 2-5mm.
PEENING THE SCYTHE
1 - General
Peening is the process of reshaping the bevel by hammering the edge, the so called "cold forming". This "cold forming" or kneading of the material makes the edge harder and tougher.
To reduce the friction between the cap and the scythe blade, add a few drops of oil (you can use cooking oil) onto the contour or into the hole of the cap. As a result, the material flows more easily, and the surface of the cap stays smooth. The oil trace on the bevel allows you to see the feed rate. Feed rate after every beet approximately 1-2mm!
Ensure to choose the correct pressure when holding the blade against the guidepost. If there is not enough pressure against the guidepost, the edge will be pushed away. If you push the blade onto the guide post too hard, the edge may become too compressed. Peening is carried out from the heel to the lip/toe of the blade.
2 - Using the silver cap (1 ring)
The silver cap works approximately 2-4mm away from the edge, makes the blade thinner and prepares the bevel. It also prepares the front section of the edge to be peened thin and sharp (1-2mm), done by the gold (2 rings). Ideally the blade's bevel should be peened to a thickness of approximately 0.5 to 0.3mm with the silver cap (1 ring)!
It is important that the force with which you hit the cap needs to be adapted to the blade! This can be assessed with a test. Peen a short section and inspect it thoroughly (possibly using a magnifying glass) to assess if there are any changes. If you cannot see any changes, increase the impact force until you notice a clearly visible change on the edge! Do this test with both caps!
With a blunt edge, where the bevel has become too steep, it is best to do a number of passes until it has reached the desired thickness of approx. 0.5 to 0.3mm.
Several passes are generally better than thinning the scythe in just one pass.
When using the silver cap (1 ring), there is basically no risk of harming the blade or causing tears to the blade. As a result, you can use forceful strikes. Minimum hammer weight is 800g! Weak strikes are often the reason why the bevel is too narrow and the optimum edge thickness of 0.5 to 0.3mm cannot be achieved!
3 - Using the gold cap (2 rings)
Use the gold cap to prepare the cutting edge. Peening is carried out until a thickness of approx. 0.2mm is achieved. Peening to a blade thickness of less than 0.2mm does not make sense, as the bevel will not have enough stability (the bevel does not stand up - it is not tough enough!). There is also a risk of fine tears and edge being bent over.
Make sure to drop the hammer onto the cap directly above the edge during peening! This ensures perfect transmission of the impact energy onto the edge!
4 - Checking the peening
Press the scythe blade against the horizontal hammer handle at an angle of approx. 45 degrees using pressure of approx. 2kg.
This should change the shape of the edge. If you cannot detect any change, the bevel / the edge is still too thick and you need to repeat the procedure, alternating between caps SILVER / GOLD, until the shape of the edge can be changed.
If the shape of the edge remains changed once the pressure is removed, the bevel is too thin. The bevel and the edge are prone to damage!
For a lasting edge come back after 2 hours of mowing and to one or two passes again with the gold cap.
This peening jig tool allows you to quickly peen the scythe in a relatively simple way. Working with it is really easy and can be done by everyone but there are some steps to observe to avoid damaging the blade or the peening jig and to achieve the right thickness of the blade edge. The result can be very good.
The minimum recommended hammer weight for use with this hammer recommended by Schröckenfux is 800 g.
Do not use high-speed grinders on scythes and sickles - these will only degrade the blade.
For parts of the peening jig, please refer to the corresponding image displayed above.